Monday 31 December 2012

Colour My World Green

This is it! The last day of the Colour My World Challenge. I want to say a huge thank you to Ginette, MC and Janine for participating and inspiring me to keep going with this challenge. I had a great time learning and experimenting with a different colour each month, but the highlight for me was seeing what each of you did each month. I've also really appreciated all the words of encouragement and support that you awesome readers have given me and the participants throughout the year so thank you too!

For my green challenge, I decided to combine a couple of the techniques I learned from Heather Lair this summer for making a pine tree. Here is my green challenge.


I used the same torn-strip appliqué method as the wee landscape, but used it to make a fur fir tree. For the quilting, I did the 1/4" improv straightline quilting that I also learned from Heather and did with Heathia.
Detail of the quilting and the torn-strip appliqué
As with the other challenges, it is 14.5" square, with a zigzag finish. I'm not thrilled with how it turned out, but I learned a few more things about torn-strip appliqué:
  • I forgot to put a piece of fabric under the torn-strips. It's fine if the strips are very tight together, like mine are, but if there's any space, the white Timtex shows through.
  • If the fabric isn't hand dyed (ie. largely the same colour on both sides), then the lighter side colour becomes more dominant. I used scraps of commercial prints for a lot of the strips, which meant the unprinted back lightened up the colour significantly, making most of the tree much lighter than I had intended.
  • The background star batik feels too busy for the tree. Something simpler would have been better, I think.
Live and learn, eh?

Here is a collage of all my Colour My World Challenges this year, in order of completion. It's very cool to see them all together. There's clearly an asymmetrical thing going, eh?


I'm still undecided about what to do with them. On the one hand, it would be fun to put them all together as a Colour My World Challenge quilt-as-you-go piece. But then again, I really love a few of the pieces and think that maybe I should just finish those separately. Thoughts?


Thank you again for joining me on this challenge, whether it was by participating or the encouragement and feedback all along the way. It's been a very fun journey!

Sunday 30 December 2012

An HBC Point Blanket Quilt Of Your Own


As I was reviewing my list of goals for 2012 the other day, I realized that I never finished sharing my Hudson's Bay Company (HBC) Point Blanket Quilt instructions. Whoops!

So without further ado, here are the complete instructions for my 
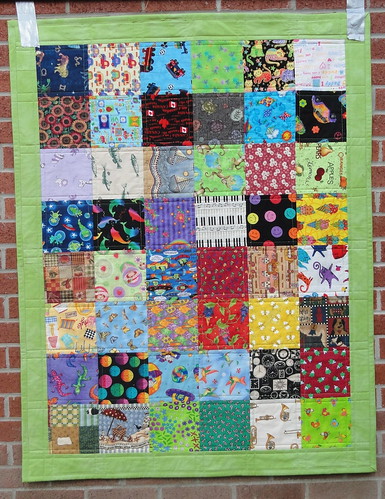
Canadiana quilt that I made with the traditional HBC point blanket design on the front and my 'party on the back' layout for the back. If you want to make a more true HBC point blanket quilt, just make a second top.

This will make a 90" by 90" quilt.

Fabric Requirements (NB: These are generous fabric requirements. I did not want a seam in the stripes and I knew I'd be using the colour stripes on the back too so I bought the stripe fabric for the width of the quilt):
  • 3 - 2.5 meters (3 yards) of off-white cotton, totalling at 7.5 meters (9 yards total) of off-white cotton
  • 2.5 meters (3 yards) indigo cotton
  • 2.5 meters (3 yards) yellow cotton
  • 2.5 meters (3 yards) red cotton
  • 2.5 meters (3 yards) green cotton
Cutting Directions:
1. Fold all of your fabric so you will be cutting along the length of the fabric instead of the width. Trim off the selvedges.
2. From the off-white fabric, cut:
  • 1 - 22.5" wide by 92" piece (top)
  • 2 - 6.5" wide by 92" pieces (top)
  • 6 - 4.5" wide by 92" pieces (top)
  • Trim one 2.5 meters panel to 94" and remove the selvedges (backing)
  • 2 -13.5" wide by 94" pieces (backing)
  • 3 - 4.5" wide by 94" pieces (backing)
  • 4 - 2.5" wide by 94" pieces (binding)
 3. From each of the indigo, yellow, green and red, cut:
  • 2 - 4.5" wide by 92" (top)
  • 1 - 4.5" wide by 94"(backing)
Layout Directions:
Top:
1. Layout your 92" stripes according to the design below, with your 6.5" off-white strips on the ends and the 22.5" piece as your centre.

2. Sew them together using a 1/4" seam allowance. Press seams open or towards the coloured fabric.


Backing:
1. Layout your 94" stripes according to this design, with your 13.5" pieces on the outside edges.
2. Sew them together using a 1/4" seam allowance. Press seams open or toward the coloured fabric. (NB: Depending on the width of fabric for your large off-white centre, the backing may be up to 8" wider than your top. You can trim it down now or wait until it's basted or quilted so that you have some flexibility when lining it up with the top. I waited until after the quilting to trim it.)

Finishing the Quilt:
1. For the basting, lay out your backing wrong side up and tack down well with masking tape.
2. Add your batting, smoothing as you go.
3. To get the backing and top stripes to be accurately perpendicular to each other, you can use your ruler. Start by rolling your top from the top and bottom edges towards the centre so that you essentially have a long, skinny double sausage. Place your double sausage in the centre of the batting/backing so that the stripes in your top will be perpendicular to the ones on the back. Slowly unroll towards the bottom, using your ruler to check that the top stripes are perpendicular to the backing stripes. I found that I could check the backing lines by gently lifting the top and batting or by feeling for the seams, working from the centre to the left, and then centre to the right. Take your time with this part.
4. Once you are happy with the line up of the lines, baste (I did pin-basting) very close together so there is no shifting.
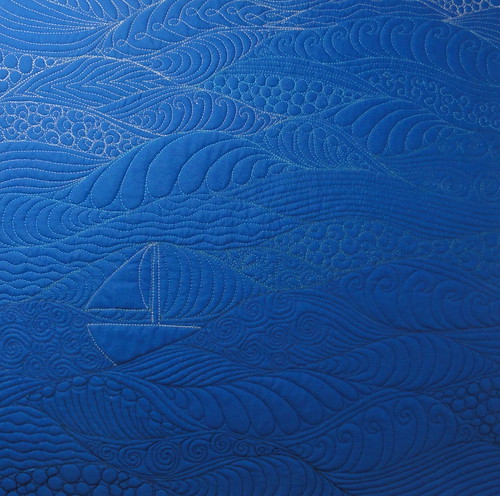
5. Quilt as desired. I did in-the-ditch quilting along the top stripes to stabilize the quilt and then filled in with straight-line quilting about 3/8" apart in the colours that matched the top.
6. Trim to 90" by 90" and bind.


And voilà, you have your own HBC quilt. If you do make one, I'd love to see it and know if these directions are clear and easy to follow or could be improved.

Cheers and happy quilting!

Saturday 29 December 2012

TGIFF! - A Little Something For The Bling

We had a truly wonderful Christmas, for which I'm so thankful! Although it's only been a week, it feels like ages since I got to do some sewing. I made a few handmade gifts this year that I couldn't share until now. I made a few of these little travel jewellery pouches using this tutorial


It's a great tutorial and I'd do it again. One thing I did differently than the tutorial is that I topstitched both the outer circle and the inner circle, which I find gives it a nice finished edge. Next time, I'd start the buttonhole for the cord at 1.25" from the edge, rather than 1.5" as the tutorial recommends. I'd also make the buttonhole a little smaller. I love how they turned out and I'm happy to say that they were well-received. I may just have to make one of these for myself!

Just getting in under the wire to link up with TGIFF! this week, which is with Shanna @ Sparrow in Flight

Monday 24 December 2012

Joyeux Noël!

Merry Christmas and happy holidays, all! From my family to you and yours, we hope you have a wonderful Christmas if you celebrate it.


I came across this fabulous version of O Holy Night by Amos the Transparent (Ottawa-based band even!) the other day that I just have to share with you. It's not on iTunes, but the link has a free download. Enjoy and all the best!


Thursday 20 December 2012

Thursday Randomness

Like many folks during the holiday season, I've been doing a lot of baking. I have a number of must-makes each year - Chocolate peanut butter balls (two batches of this one because the first never makes it to Christmas), fudgey chocolate oatmeal squares, Agnes bars, cranberry and white chocolate chip cookies, gingerbread cookies, and sugar cookies -- but I like try one or two new ones each year.

I think I found a new family favourite this year through Pinterest. It's called Chocolate Saltine Toffee, but I've also heard it referred to as Christmas Crack or Toffee Bark. It is quick and easy to make (I'm all about the easy baking!), and best of all, delicious.

Other Pinterest finds that got kidlet-thumbs up include Chicken Gloria, World's Best Chicken (I wouldn't say world's best, but it's good), Chocolate Cobbler (it did not look appetizing coming out of the oven, but it tasted great), and Baked Apple Pie Egg Rolls.

Speaking of kidlets, we went to get the Christmas tree this past weekend, where my kids love to have the Christmas tree fall on them. It happened by accident a couple of years ago and now it's become a bit of a tradition (they have to look down and cover their heads as it's coming down though). Giggles galore. :D

Linking up with Cindy at Live a Colorful Life to celebrate all things random.

Happy Thursday all!

Wednesday 19 December 2012

Works in Progress Wednesday - December 19, 2012

Ah, my last WIP post of 2012!

New Projects:

Pillowcases for Newtown: Like many people, I'm having a hard time dealing with what happened in Newtown. I've read news articles, but haven't watched much of the TV coverage. I just can't. I'm trying to keep busy and positive for my kids, but I bawled during their Christmas concert yesterday.

So I'm making pillowcases. It's not much, but it's something I can do since I can't vote to change the gun laws in the States (yes, I know it's more than just about guns, but had he not had such ready access to so many guns, many more of those children and teachers would still be alive) or improve mental health services there.

If you'd also like to make pillowcases for the survivors and the other children in Newtown, here's the tutorial I used and here's where I'm sending mine:

Quilters Corner
312 Danbury Rd.
New Milford, CT USA
06776 

Here are the pillowcases I made -- hopefully they will help give some children some sweet dreams.


Completed Projects:

Jelly Belly: Done and blogged about here.

Jelly Belly - Front
Jelly Belly - Back
Current Projects: 


Su{Brrr}nova: Last two blocks done. As I was laying out the blocks though, I didn't like the stripes in the centre block so I did a little snip and tuck to change that out. Much better.

Centre Block


Travellin' Pic Stitch Blog Hop: No progress

Wedding quilt
Nine patch colourwash

WIP Wednesday Recap: Still under 20!
New projects: 1
Completed projects: 2
Current projects: 3
On Hold/UFO: 15

Right Click to Save ImageWIP Wednesday at Freshly Pieced

Hoping that you are having a wonderful Wednesday!

Monday 17 December 2012

Colour My World Green

Color icon green.svg
From wikipedia.org
We are in the home stretch of the Colour My World Challenge,  people! We've made it through 11 colours so far -- some fun and some, well, not so fun (I'm talking to you, Orange). We're going to end on a fun one, I think. Green!

From Pantone.com
And guess what? Emerald is Pantone's Colour of the Year for 2013. It's like I'd planned it or something. ;) Pantone calls Emerald, "Lively. Radiant. Lush… A color of elegance and beauty that enhances our sense of well-being, balance and harmony." {Edited} Generation Q Magazine has an article today on Emerald -- check it out!

According to Sensational Color, "green occupies more space in the spectrum visible to the human eye than most colors, and is second only to blue as a favorite color. The natural greens, from forest to lime, are seen as tranquil and refreshing, with a natural balance of cool and warm (blue and yellow) undertones." Green comes between blue and yellow on the colour wheel and in the light spectrum. Green is a primary colour in additive (light) colour theory, but a secondary colour in subtractive (pigment/dye) colour theory.

Green is considered the color of peace and ecology. Green soothes and relaxes us mentally, as well as physically. It helps alleviate depression, nervousness, and anxiety and offers a sense of renewal, self-control, and harmony.

Random tidbits about green from Wikipedia and Sensational Color:
  • For those of you planning a fashion show, there is a superstition that sewing with green thread on the eve of a fashion show brings bad luck to the design house. 
  • As we learned last month with the colour blue, some languages like old Chinese, Thai, old Japanese, and Vietnamese, use the same word for blue and green. 
  • In several religions, green is the colour associated with resurrection and regeneration. 
  • In some areas of Algeria, houses painted in green indicate that the inhabitants have made a pilgrimage to Mecca. 
  • As the colour of Ireland, green represents the vast green hillsides, as well as Ireland's patron saint, St. Patrick. The God of fertility in Celtic myths was associated with green. Green is the color that represents Irish-Catholics, while orange represents Irish-Protestants. 
  • Libya is currently the only national flag of a single color -- you guessed it, green!
  • Forget red; green is the colour of love associated with both Venus, the Roman goddess and Aphrodite, the Greek goddess. 
  • Green is the colour adopted by the environmental movement and is also used to symbolize a range of causes, such as organ donation and transplant, awareness of Bipolar Disorder, solidarity with Chechnya, and support of farmers in America. 
  • The human eye is most sensitive to and able to discern the most shades of green, which is why green is used for night-vision goggles. 
  • Bright green is the color of the astrological sign "Cancer." 
  • Dr. Pierre Ordinaire commercialised 'modern' absinthe as a cure-all in 1792. Then, Henri-Louis Pernod founded the Pernod Fils absinthe company in 1805, seeing its aperitif potential. Absinthe's moment came with the 1840's Algerian wars, when French soldiers drank it as a prophylactic against disease. They brought it home, and by the 1860s, Parisian cafes had established 5 p.m. as "l'heure verte" - "the green hour." 
  • NASCAR racers had (have?) a superstition about the colour green for decades. Reportedly, it began after a 1920 accident in Beverly Hills, California, that killed defending Indianapolis 500 champion Gaston Chevrolet. It was the first known racing accident in the United States to kill two drivers, and Chevrolet reportedly was driving a green car. Tim Richmond once refused to drive a car sponsored by Folger's decaffeinated coffee because the primary color was green. He wound up in the Folger's regular coffee car - and its red scheme. But the fear of green cars is fading, primarily because sponsors are willing to pay $15 million to splash their colors on a race car. Green is now the primary color of cars driven by Mayfield, Marlin, and J.J. Yeley. 
  • The message you send by driving a dark green vehicle is that you are traditional, trustworthy, and well-balanced. If, however, you drive a bright yellow-green vehicle, you are trendy, whimsical, and lively. Fun!
Now we know a bit more about green, but what's it like to be green? Kermit tells us...


Other random Green resources:
What does green make you think of? Feel? What would you do with green? Do you use green in your quilts? I used to, but haven't over the last couple of years. Let's see if this month changes that.

I'll be putting up the linky party for this last colour on December 31st. The rest of the challenges are also still open until then.

Be safe, be happy, be green!

Sunday 16 December 2012

Quilting Gallery Blog Hop Giveaway Winner

Thank you all for entering my giveaway and for sharing your favourite quilting books. Thanks to your suggestions, I have some great ideas for Santa. :) A big, happy welcome to those of you who decided to follow along -- I always have fun with my projects...whether they are going well or not-so-well. :)

With so many participants all across the world, it rarely happens that I know the giveaway winner personally so I was excited when I went to see Mr. Random Number Generator's selection of #15...Heather J! Heather J is a member of my quilt guild. Woo hoo! Congrats, Heather! 

I am a follower. :)
I enjoyed Material Obsession and I do like the Elm Creek series.

There will be another giveaway soon for My Memories software so stay tuned!

Thursday 13 December 2012

TGIFF! - Jelly Belly

Quilting Detail On the Back
Welcome to TGIFF!

My finish for this week is Jelly Belly. As I mentioned last week, this was made with a jelly roll, as well as some white from my stash.

For the quilting, I did loopy loos of different sizes. Once again, I found it more challenging to do larger quilting motifs than small ones -- I definitely need more practice! In the white strips, I did some loop twists (?) and in the triangles, I alternated with some designs that give it an art deco feel. I'm sure someone has named these designs, but I don't know the names.

Jelly Belly - Front
Jelly Belly - Front
Quilting Detail - From the Front
When it came to choosing the binding, I realized that I had a bit of a problem. When I picked out the whites for the front and the back, they looked like they matched (it was night). In the bright light of day, I realized that they were not similar enough. Whoops!

I had hoped to use white, with the remaining triangle scraps, but it was clear that whichever white I used, it would look off on the other side. One option I thought of what to do scrappy using both whites.

Then I thought about channeling Rita of Red Pepper Quilts -- WWRD (What Would Rita Do)? Maybe a black and white stripe? Fun! I think it works, even though my camera wouldn't take a proper close up photo of the stripes.

Quiltography: "Jelly Belly," by Michèle-Renée Charbonneau, Ottawa, 33.5" by 51.5", 2012.

Simply Solids {A Modern Bee}

Simply Solids: a modern {bee}Calling all Canadians, there is a new bee in town and we need more members!

It’s a 12-month commitment starting February 1st, 2013 and all skill  levels are welcome! Are you up for it?

This is actually a worldwide bee but each region has a group of 12. Currently, Canada only has 5 members. Shipping would be within Canada only (unless there aren’t enough members) and you can either send out fabric to your members or stash bust so no one has to go shopping. For more details, visit Sew at Home Mummy.

I think it will be lots of fun so come join us!

Wednesday 12 December 2012

Works in Progress Wednesday - 12-12-12

Ah, there's nothing like WIP Wednesday to hold one accountable, eh? It's been three or four weeks so it seems like a lot.

There's still time to enter my Quilting Gallery Blog Hop Party giveaway, if you haven't had a chance.

New Projects:
Su{Brrr}nova: I've always loved this Supernova quilt by Lee at Freshly Pieced and now I'm making my own! First block here, three more blocks here, and below are a few more. Thanks to Pam from Mad About Patchwork for some more Snowflakes in Red, I was able to finish the centre block. Thank you, thank you, thank you, Pam! Now, just two more blocks to do!

Centre Block


Jelly Belly: Top and backing are done and ready to be basted.


Completed Projects:

DSC09766
Paint Chip Placemats
Paint Chip Placemats: First handmade gift done!

Wee Spy - Butterflies
Wee Spy Bag
Commissioned quilt: I finished the Wee Spy quilt for my friend's cousin and it's currently wending its way through the postal system to its new, adorable owner. I'm thinking that she'll have a lot of fun doing tummy time on this quilt. I'm excited that this commission has led to another commission. :D Yay!

Wee Spy - Butterflies Back
Super cute butterflies for the backing


Wee Spy - Butterflies Front
Spring Green for the front
Colour My World Blue: This month's Colour My World Challenge is blue and I thought I'd work on my free motion quilting. It's coming along well so far and I'll share it on Friday for the link up!

Rough Seas

Current Projects: 

Travellin' Pic Stitch Blog Hop:
The Travellin' Pic Stitch Blog hop is done -- what a fun idea! My block is appliquéd on a white background, but that's about it. Thinking pillow, but maybe bag. Thoughts?


Seeing the Forest for the Trees Quilt: I figured out what to do with the layout, but it means doing four more blocks.

On Hold/UFO Mash-up:
Don't Worry {Bee} Happy Bee - Two of my beemates blocks arrived this week and they look great! Can't wait to see the rest.
Appliqué/Quilt/Paint Thing
Mini I Spy Charity Quilt
Modern Block Monday Sampler 
Chop Suey
Wedding quilt
Nine patch colourwash

WIP Wednesday Recap: Woo hoo! We're still under 20!
New projects: 2
Completed projects: 3
Current projects: 2
On Hold/UFO: 15

Related Posts Plugin for WordPress, Blogger...