Showing posts with label Tutorial. Show all posts

Thursday, 9 July 2015

TGIFF! - A Case for the Precious

Hello darlings and welcome to TGIFF! The place where every finish deserves a party! I have to say that it was looking dodgy about whether I'd have a finish to share (again) this month. I have several projects on the go, but nothing close enough to being finished.

Until yesterday.

I got a tablet at work yesterday -- 21st century baby! Since I take my computer to a lot of meetings and bring it home most nights, my new tablet needed some special and, dare I say it, fabulous protection from the elements (a.k.a. me). Something bright and fun.

I pulled out some improv blocks I've been making over the last couple of months and put them together.


I made the case using the laptop case tutorial I made for the Sew Sisters Kona Club Challenge a couple of years ago, with a few modifications.


Modifications included adding two layers of batting for more cushion and making the flap asymmetrical.


The quilting is improv too and done with a dark grey Aurifil #2630. It's a little dodgy (clearly the word of the day) in spots, but this case is going to get used and abused so I'm not fussed about it.

And inside...a perfect reminder to keep things in perspective...and to daydream about quilting. :)


Definitely a TGIFF!


Monday, 26 January 2015

Modern Block Monday - Leggings Block

The moment I saw Elizabeth Hartman's Knee Socks block, I was smitten. It's a block that finishes at 24" though, a little too large to be asking my OMQG Bee mates this month. I decided to do a cross between her Knee Socks block and the blocks I'll be making for this Fibonacci Flow design.

I give you...Leggings. ;)

It's a 12" finished block, fun for stash picking. I couldn't rightfully say stash busting because it just doesn't use all that many scraps, but it is fun.


Wanna make one yourself?

Cutting Directions:

Background fabric (charcoal grey in this case):
A - Four (4) - 1.5" x 6.5"
B - Six (6) - 2.5" x 6.5"
D - Two (2) - 2" x 6.5"

Scraps:

C - Ten (10) - 1" x 6.5"

Layout:

1) Sew the pieces together in each of the columns according to this layout diagram.


2) Sew the two columns together.

I'll be providing the charcoal grey for my bee mates and asking them to scrap bust the scraps so I can get a good variety of fabrics. I'll also be asking them to keep the columns separate so I can mix and match them with other blocks.

Here are a few designs I've been playing with for this block:

All About Those Leggings: 


I Just Need Some Space - Lap:


I Just Need Some Space - Twin:


Enjoy!

Monday, 14 April 2014

Modern Block Monday - Feathers

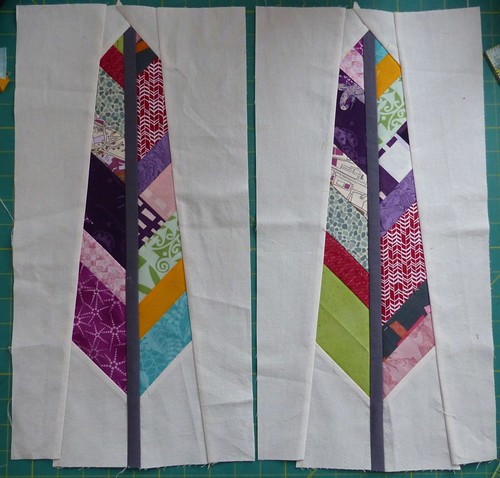
I've loved Anna Maria Horner's Feather Bed quilt for some time. For my OMQG bee, I chose the Feather block. Now what I didn't realize when I chose it, is just how tricky it would be to figure out how to make just one block. According to the free pattern (Thank you, Anna!), one block contains two feathers. A friend gave me this great link that makes the feather cutting simpler. I fiddled with Meredith's measurements and figured out that 10" strips will make two feathers. Here is my practice block:

March OMQG Bee 2 Block

The making of the strip blocks for the feathers is fussy, but otherwise, it's a pretty straightforward block. I really love the look. I can't wait to see what my bee mates come us with.

In case there are some of you who just want to make two feathers (maybe for a bee or a pillow), here are the instructions I gave my bee mates:

Please read through all of the instructions before beginning. 

Fabrics:
1 fat quarter of a background fabric (cream) 
2 - 1" by 19" strips for the feather stem (grey)
Feather edges -  A variety of 10” fabric strips of varying widths between 1.5”-3”. Bright, medium value fabrics work best.

Directions:

1) Print out and tape together the templates from Anna Maria Horner’s Feather Bed Quilt pattern

2) For the feathers, use 10” strips in varying widths of 1.5-3”. You will need enough for your feather template to fit on (12” high is good). Follow this tutorial for assembling and cutting out your feather edges — it's more fabric economical than Anna Maria’s instructions.

3) Using the remaining templates, cut out 4 F pieces first, then 4 B pieces, 2 D pieces, and 2 E pieces from the cream background fabric. 

4) Assemble the feather blocks according to Anna Maria’s pattern instructions on pages 4 and 5

You should now have two feather blocks of approximately 18.5” by 9.5”. 

Clear as mud? Feel free to post any questions or comments below.

Friday, 12 April 2013

Kona Club Challenge and Giveaway? I Accept!


Hi all, when Sew Sisters contacted me to see if I'd like to participate in the Kona Club Challenge, I said heck ya! I do love working with Kona solids.

I chose their October palette - Kona Black, Kona Charcoal, Kona Coal, and Kona Iron, as well as added in some Kona Snow for pop.

I used these yummy tones to make this Improv-Pieced Laptop Case. There's a tutorial on the Sew Sisters blog if you want to give it a go as well.  

Check out the Sew Sisters blog for the tutorial and a giveaway! Yes, that's right, there's a giveaway of this bundle up for grabs!


SewSistersQuiltShop

Monday, 4 February 2013

Trapunto Tutorial - Something New Sampler

Today is my day for sharing a new technique for the Something New Sampler with Amy @ The Cute Life. If you're here for the first time, welcome! For everyone else, welcome back!

My block in the sampler features trapunto. Trapunto, which comes from the italian term "to embroider", is a stuffed quilting technique that gives great texture to quilts.

This trapunto technique used to intimidate me -- mostly because I'd see in in fabulous heirloom quilts and think that there's no way I could do that. Having done it a couple of times now, I can safely say that there is nothing to be afraid of and I'm going to show you how to do it so you can say the same.

Please read all the instructions of the tutorial before beginning.

Fabric for block
Materials:
1 - 3.5" x 16" background colour (I chose white)
1 - 5.5" x 16" background colour (white)
Scraps of 1.5" wide fabric to create a 1.5" by 16" strip
Water soluble thread (I use YLI Wash-A-Way Water Soluble Thread)
Water soluble pen (I use Unique)
2 pieces of 4" x 13" batting
Batting and backing for your block/quilt

Instructions:

1. Sew your scrap centre strip together until it reaches 1.5" by 16" and lay out your block pieces as shown in the photo, with the 3.5" x 16" background piece on the left and the 5.5" x 16" background piece on the right of the coloured strip.

Block layout

2. Sew your block together and make sure the bottom is square to your coloured stripe.


3. We are now going to mark the squares for the trapunto. You can do a design of your choice -- just make sure that the motif is a closed one. For the purposes of this tutorial, I did three square frames. To make the square frames, place your ruler 1/2" to the left of your coloured stripe and, measuring from the bottom of the block, mark from 3" to 5",  7" to 9" and 11" to 13" with your water soluble marker.


4. Placing your ruler 1" to the left of your coloured stripe and measuring from the bottom, mark from 2.5" to 5.5", 6.5" to 9.5" and 10.5" to 13.5" using your water soluble marker.


5. Repeat the same markings for the right side of the coloured stripe.


So your block now looks like this.


6. Connect your lines so you are making three square frames.


7. Now you are ready to do the trapunto. Layer your two 4" by 13" pieces of batting behind the squares (no backing yet) and baste.  


8. With the water soluble thread as your top thread and regular thread in the bottom, sew along your marked lines. NB: Using water soluble thread gives a cleaner final product, but if you don't mind thread build up and can sew well on top of another thread, you can use regular thread, if you like. 

Water soluble thread on the top
Regular thread (white/off-white on the back to blend in with the batting)

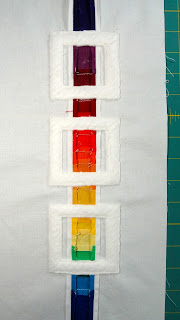
9. Once you've sewed all the squares, carefully trim away the excess batting from around the squares. I remove one layer of batting at a time. It is easy to nick the front of your block, so take your time with this step.


10. Next, carefully pull the centre batting away from the block top and cut away the batting from the centre of the squares, leaving a frame.


At this point, you could trim up your block to 7.5" by 14.5" and attach it to your remaining sampler blocks. However, this is not the end of the trapunto process.

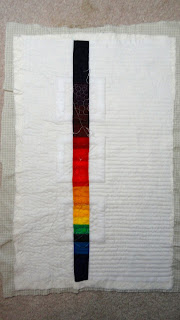
I've finished the block to show you how to finish the trapunto. Because I've finished my block, I'll be doing my sampler quilt as quilt-as-you-go instead, which is an option for you as well, but it means you need to quilt all of your sampler blocks before attaching them.

11. If you are doing quilt-as-you-go, layer the top of your untrimmed block on your batting and backing and baste. The quilting will shrink the block so you want to wait until you have finished the trapunto process before trimming. If you've sewed your trimmed block into your quilt top, layer your quilt top on your batting/backing and baste.


12. Using the quilting thread of your choice (not the water soluble!), sew over the water soluble thread to secure the extra batting between your block top and batting/backing.


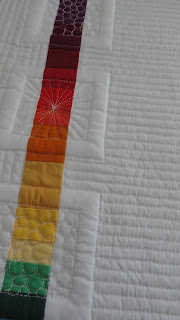
13. The trapunto looks best if the quilting around it is quite tight or dense. Quilt the rest of your block/quilt as you wish. Here are some options I sketched out using trial quilting sheets


My quilted block, using Aurifil 2021 (40wt):
Front
Quilted Block - Back

14. Once your block/quilt is quilted, it's time to removed the water soluble thread and marker. Soak in water and lay flat to dry on a towel.


15. When your block/quilt is dry, trim or square it up to 7.5" by 14.5". Voilà -- you've made a trapunto block! Not so scary, eh?
Finished trapunto block
Detail of the trapunto
If you have decided to do this as a quilt-as-you-go quilt, you can follow my tutorial or Leah Day's tutorial to attach it to the other quilted blocks of your quilt. If you are working with a full quilt at this point, then just bind as usual.

If you have any questions about this tutorial, you can post them here or in the Flickr discussion thread.
Don't forget to post a photo of your block to the Flickr group so we can see what you've done. Also, be sure to check out Heidi @ Fabric Mutt's block this week too -- she's showing you how to do cathedral windows!

something new sampler header

Sunday, 30 December 2012

An HBC Point Blanket Quilt Of Your Own


As I was reviewing my list of goals for 2012 the other day, I realized that I never finished sharing my Hudson's Bay Company (HBC) Point Blanket Quilt instructions. Whoops!

So without further ado, here are the complete instructions for my Canadiana quilt that I made with the traditional HBC point blanket design on the front and my 'party on the back' layout for the back. If you want to make a more true HBC point blanket quilt, just make a second top.

This will make a 90" by 90" quilt.

Fabric Requirements (NB: These are generous fabric requirements. I did not want a seam in the stripes and I knew I'd be using the colour stripes on the back too so I bought the stripe fabric for the width of the quilt):
  • 3 - 2.5 meters (3 yards) of off-white cotton, totalling at 7.5 meters (9 yards total) of off-white cotton
  • 2.5 meters (3 yards) indigo cotton
  • 2.5 meters (3 yards) yellow cotton
  • 2.5 meters (3 yards) red cotton
  • 2.5 meters (3 yards) green cotton
Cutting Directions:
1. Fold all of your fabric so you will be cutting along the length of the fabric instead of the width. Trim off the selvedges.
2. From the off-white fabric, cut:
  • 1 - 22.5" wide by 92" piece (top)
  • 2 - 6.5" wide by 92" pieces (top)
  • 6 - 4.5" wide by 92" pieces (top)
  • Trim one 2.5 meters panel to 94" and remove the selvedges (backing)
  • 2 -13.5" wide by 94" pieces (backing)
  • 3 - 4.5" wide by 94" pieces (backing)
  • 4 - 2.5" wide by 94" pieces (binding)
 3. From each of the indigo, yellow, green and red, cut:
  • 2 - 4.5" wide by 92" (top)
  • 1 - 4.5" wide by 94"(backing)
Layout Directions:
Top:
1. Layout your 92" stripes according to the design below, with your 6.5" off-white strips on the ends and the 22.5" piece as your centre.

2. Sew them together using a 1/4" seam allowance. Press seams open or towards the coloured fabric.


Backing:
1. Layout your 94" stripes according to this design, with your 13.5" pieces on the outside edges.
2. Sew them together using a 1/4" seam allowance. Press seams open or toward the coloured fabric. (NB: Depending on the width of fabric for your large off-white centre, the backing may be up to 8" wider than your top. You can trim it down now or wait until it's basted or quilted so that you have some flexibility when lining it up with the top. I waited until after the quilting to trim it.)

Finishing the Quilt:
1. For the basting, lay out your backing wrong side up and tack down well with masking tape.
2. Add your batting, smoothing as you go.
3. To get the backing and top stripes to be accurately perpendicular to each other, you can use your ruler. Start by rolling your top from the top and bottom edges towards the centre so that you essentially have a long, skinny double sausage. Place your double sausage in the centre of the batting/backing so that the stripes in your top will be perpendicular to the ones on the back. Slowly unroll towards the bottom, using your ruler to check that the top stripes are perpendicular to the backing stripes. I found that I could check the backing lines by gently lifting the top and batting or by feeling for the seams, working from the centre to the left, and then centre to the right. Take your time with this part.
4. Once you are happy with the line up of the lines, baste (I did pin-basting) very close together so there is no shifting.
5. Quilt as desired. I did in-the-ditch quilting along the top stripes to stabilize the quilt and then filled in with straight-line quilting about 3/8" apart in the colours that matched the top.
6. Trim to 90" by 90" and bind.


And voilà, you have your own HBC quilt. If you do make one, I'd love to see it and know if these directions are clear and easy to follow or could be improved.

Cheers and happy quilting!
Related Posts Plugin for WordPress, Blogger...