Tuesday 31 July 2012

You Think You Know Me...

Plum and JuneWelcome to those of you coming from the Let's Get Acquainted! Blog hop. Thanks Beth for organizing such a great hop!

I'm M-R. It stands for Michèle-Renée, but a lot of people find it tricky to spell and pronounce (it sounds très sexy in French though ;) ) so I'm good with M-R. I live in Ottawa, Canada with my husband, Charles, and three boys, Patrick (7.5), Daniel (5) and Micah (3). I am bilingual, but no, I don't have a sexy French accent. I'm currently on leave from my communications job with the federal government so I can be home with my kids. When I'm not hanging out with my family, quilting or blogging, I'm playing ringette (I'm not in this video nor am I as good as those players, but it is a fun introduction to the sport by Rick Mercer, one of our comedians), volunteering as a Beaver leader and on the board for my son's nursery school, or cooking.

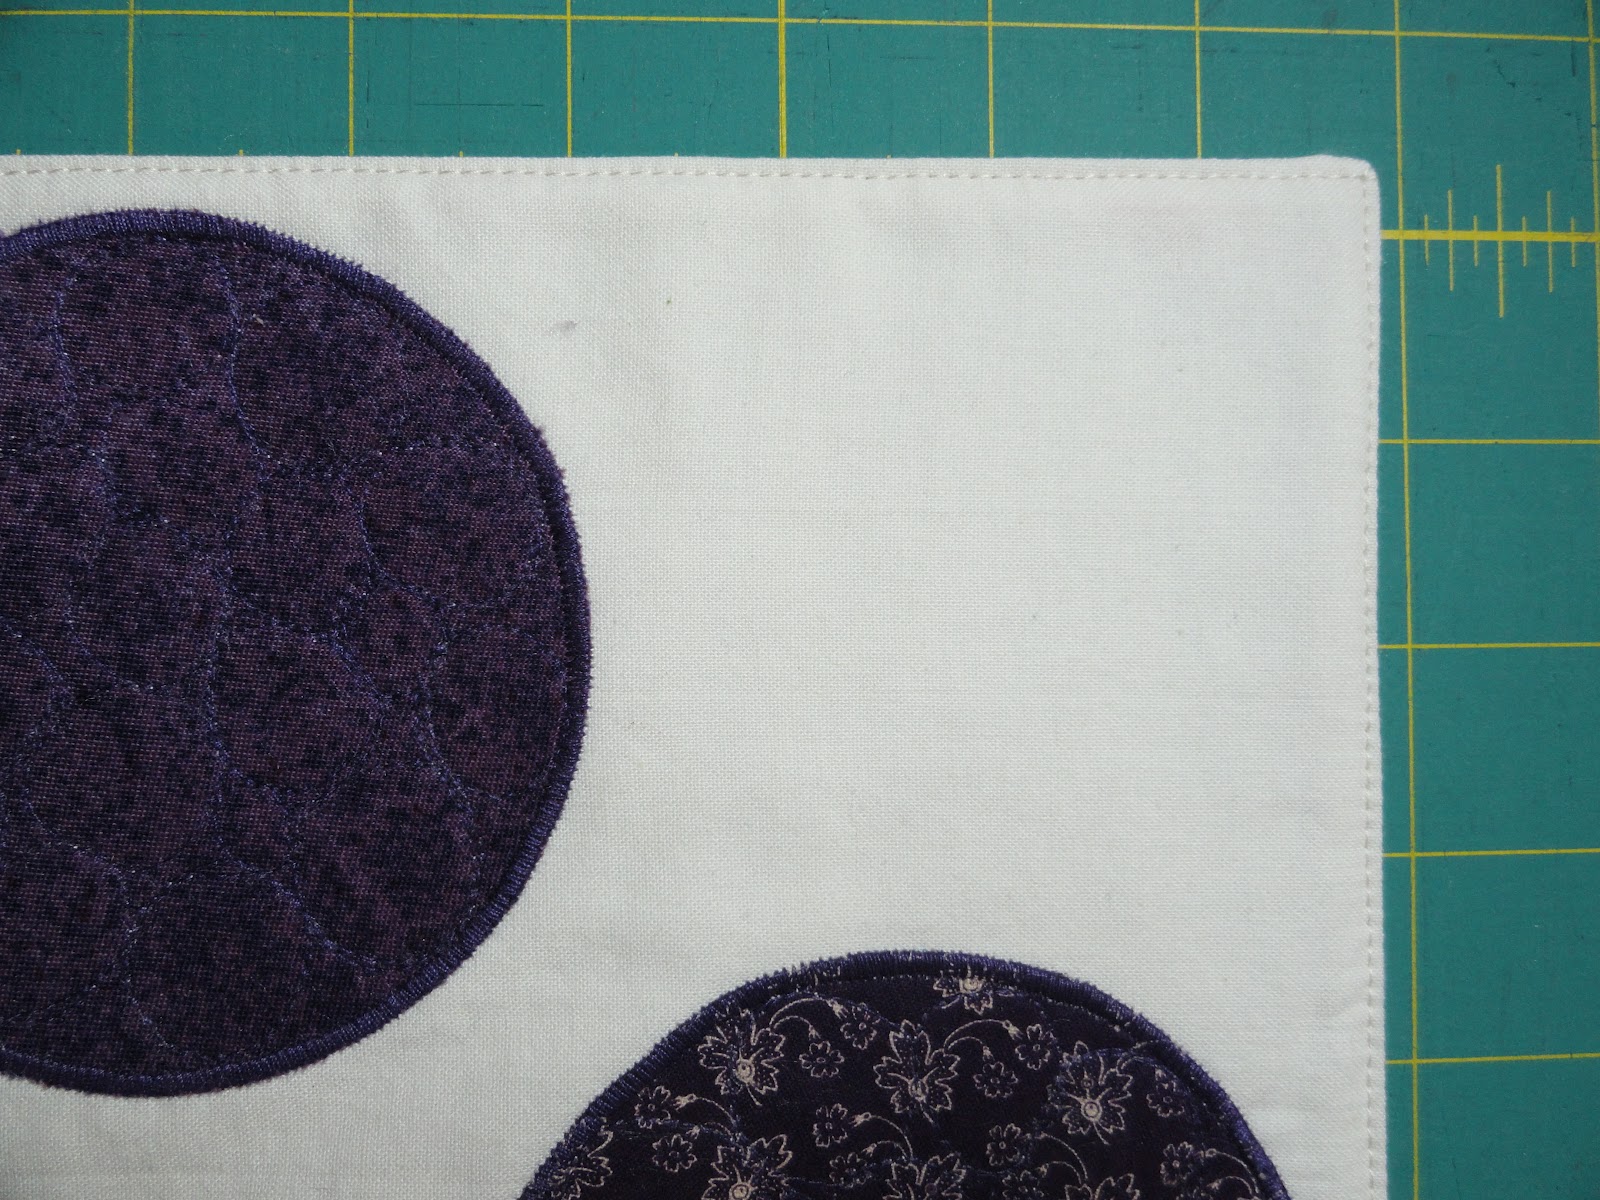
Here is a sampling of some of my projects over the last couple of years:

Beth provided some questions for participants to answer so here are some of my answers. There will be a quiz at the end of this post so be sure to pay rapt attention. ;)

How long have you been quilting?
I've been quilting regularly for 14 years, but I made my first quilt a few years earlier in university.

Favorite quilting tip(s):
I did a tutorial on how to get satin stitch points.

Favorite fabric (or wish list fabric):
Bright Remix Stripe by Robert Kaufman. Gotta find me more of that one!

Favorite craft books:
99 Modern Blocks by Susanne Woods
Art+Quilt by Lyric Kinard
Adventures in Design by Joen Wolfrom
Design Explorations for the Creative Quilter and Color and Composition for the Creative Quilter by Kate Pasquini Masopust

Favorite book (or book you are currently reading): Currently reading A Game of Thrones series.

Favorite children's book: As a kid, my favourite books were Jennifer, Hecate, Macbeth, William McKinley, and Me, Elizabeth by E. L. Konigsburg and Jeanne, Fille du Roy (The King's Daughter) by Suzanne Martel. Now, I'd add in the Harry Potter series, which I'm currently reading with my oldest son, and the Dark Materials series by Phillip Pullman.

Favorite music to listen to while quilting:
I prefer listening to audio books or having a much-loved movie going on in the background.

If I'd only known - what you wish you knew about blogging before you started your blog:
I used to write and edit a daily online newsletter in a previous lifetime so I pretty much knew what I was getting into in terms of the logistics of a blog. What I didn't anticipate is how much more quilting I'd be doing as a result of the blogging!

Enough about me, let's get to the growth chart tutorial already. I did put it on a separate post because it is very photo heavy!

Thanks so much for stopping by! I hope you get a chance to check out the other participants on the hop this week. Today is Audrey from Hot Pink Quilts and Thursday are Jennifer from GH Quilting and Danny from MommyFor Reals.

See you on the quilt side!

Growth Chart Tutorial

Welcome to my growth chart tutorial!

I'm providing the directions for making this modern bubble growth chart that I made for my niece Sophie. I've made other growth charts for my kids with this same construction, only with different design panels so each is unique. The design options are endless really.

FYI, this is a photo heavy post. I suggest you read all of the directions before beginning.

The growth chart measures 11" by 70".

Materials:
1 - 5.5” by 11” for the name plate background
1 - 3.5” by 11” for the letters of the name
1 - 3.5” by 11” tearaway stabilizer
1 - 3” by 65” for the growth scale
1 - 8.5” by 65” for the design panel
Scraps for circles of varying sizes (I chose cream, aqua/teal and lavender/purple, but you could use any palette you wish. I think this would look fun in bright solids or novelty fabrics too.)
Coordinating thread
Fusible web (Steam A Seam 2 Lite - ie. paper on both sides of the fusible web)
1 - 12” by 72” batting
1 - 12” by 72” backing
1 -  4” by 9.5” for hanging sleeve

Directions:

Name Plate:
  1. Expand the name of the child to fit on the landscape view of an 8.5” by 11” paper. Ideally the letters will be between 2” and 3” high and filled in. I used Optima font and a font size of 215. Print it out.
  2. Using a light box or window, flip the name to get the mirror image. Lay your fusible web over the name and trace the letters onto fusible web paper.
  3. Iron the fusible web and it to the wrong side of the fabric you want for the letters and cut them out.
  4. Lay the letters out on the name plate backing as you like and remove the other backing paper. 
  5. Iron into place, using a Tefflon sheet or parchment paper to protect your iron.
  6. Add tear away stabilizer to the back of the name plate and zigzag stitch or satin stitch the edges of the letters to the background.
  7. Remove the tearaway stabilizer.
Design Panel:
  1. Choose a variety of scraps large enough for the circles.
  2. On a piece of fusible web (paper on two sides, such as Steam A Seam2Lite), trace 19 circles of varying sizes from 1” to 4” and roughly cut them out. I used a scrapbooking stencil that had a variety of circle sizes, but you could use various household items.
  3. Taking one of your circles, remove the paper that is not marked with the circle and iron it to the back of your scrap. Repeat with the remaining circles.
  4. Cut the circles out along your marked lines.
  5. Place the circles on your design panel as you like. Once the circles are in the position you like, remove the remaining paper and lay the circle back where you want it.
  6. Cover the circle and background with a Teflon sheet or parchment paper to protect your iron. With your iron on the hottest setting, iron the circle through the Teflon sheet/parchment paper so that it has fused to the background. Repeat with all the circles.
Assembling the Growth Chart:
  1. Sew the design panel to the growth scale using a ¼” seam allowance. Press seam open.
  2. Sew the central panel and growth scale to the name plate using a ¼” seam allowance. Press seam open. Now you have your growth chart top!
  3. Layer the top with the batting and pin baste.
  4. Sew a tight zigzag or satin stitch around each of the circles. I also free motion quilted pebbles in the circles at this stage.


  5. Stay stitch 1/8" around the edge of the growth chart to the batting.
  6. Trim away excess batting.
  7. Make the hanging sleeve by folding in both 4” sides and stay stitching those edges. Fold in half and iron.
  8. Lay the hanging sleeve on top of the name plate and pin in place.
  9. Lay the growth chart top and hanging sleeve face down on the back and pin baste.
  10. Straight stitch ¼” along the edge of the background all the way around.
  11. Trim the backing to the edge of the batting and cut the little triangles at the corners so the corners can be made more square when it is turned right side out.
  12. Very carefully, feel for the hanging sleeve and mark a 3”-4” long slit about 1” from the top stitch line. 
  13. As you are cutting, be careful not to cut the hanging sleeve or the growth chart top. This slit will be hidden by the hanging sleeve.
  14. Carefully reach in the slit and begin pulling the growth chart gently through the opening.
  15. Once the growth chart is turned inside out, iron it flat.
  16. Cut a piece of fusible interfacing or fusible web the size of the slit. Insert it into the growth chart, positioning it behind the slit, with the fusible side facing your slit. Iron it to secure the hole.


Quilting:
  1. Topstitch along the edge of the growth chart and along the ditch between the three sections.


  2. Using a ruler, mark 1” increments along the growth chart section with a water soluble pen (test it first) or lightly with a pencil. Stitch those marked lines with a walking foot or free motion foot. I used a walking foot.


  3. Free motion stitch in the ditch quilt around the letters of the name plate.
  4. Quilt the design panel as desired. I played with a few designs using my trial quilting sheet before deciding on this bubble echo. Basically, I did an echo of the circles until they met another circle, then started echoing the next circle.


  5. Handstitch the hanging sleeve at the back of the growth chart and voilà, you have your growth chart!
Hanging and Using the Growth Chart: 

I hung our growth charts on a rod at 7 feet because I’m pretty sure my kids are going to top 6 feet. You could also use some double sided tape at whatever height you like. You probably don’t need to hang it below 12” from the ground, unless your child was smaller than 12" at birth.

I use an archival pen (Pigma Graphic 1, 1.0 mm line width) for recording my kids’ heights. I keep the pen up in the hanging sleeve so it doesn’t get lost.


Mark the height using the pen, then measure up from the ground using a measuring tape. Write in the date and the height in imperial and/or metric. Easy peasy and you don’t have to worry about writing or stitching in all those numbers!


Tip: If you are like me and missed misplaced a few of those growth milestones, trying asking your doctor for your child's growth stats.

I hope this tutorial was helpful and if you have any feedback or questions, please don't hesitate to leave a comment or send me an email at mrcharbon {at} hotmail {dot} com.

See you on the quilt side!

Monday 30 July 2012

Colour My World Pink

I'm a day early for the July's Colour My World Challenge linky today -- when am I ever early?! Tomorrow is my day on the Let's Get Acquainted Blog Hop and I'll be sharing my Growth Chart tutorial so I hope you will come back to check it out.

So. Pink. I'm not a big fan of pink, I must say. Too much of it as a kid probably. And yet I've known what I wanted to do with this colour for the Colour My World challenge for a couple of months now. I thought I might change my mind as this month progressed, but no. I picked pinks of different values from my stash, cut strips and wove them together on the batting.

I was trying to get a gradation effect of values from the upper left to the lower right. The first attempt of using the same fabrics on each axis was definitely not successful. Yuck!


I am trying to use fabrics from my stash so my choices are limited. The second attempt was not as successful as I'd hoped, but a closer to what I'd envisioned.


For the quilting, I decided to use this piece for July's 2012 Free Motion Quilting Challenge. This month was taught by Angela Walters of Quilting Is My Therapy. I thought the tiles complemented the checkerboard effect of the front although the quilting is hard to see from the front.

I have to say that quilting over the raw edges of the weave proved challenging at times. If I do this again, I'd probably do the weave on fusible batting and then iron it down to secure the strips better, instead of pin basting.

View of the tiles from the back
I used the tiles to try different motifs, in particular trying to combine two motifs like pebbles and swirls or pebbles and paisleys.

I also tried the meandering feather that Emma How of Sampaguita Quilts uses often and I'm starting to get the hang of it. Love this tile technique! It's a great way to break up large spaces into more manageable sections.


I also used this piece to play out some Aurifil thread. I had two in my stash (40 wt. Blush Rose and the variegated) and a 28wt. light rose that Alex Veronelli sent me to play with.

I used the variegated on the back and on the medium value section, with the light pink on the light area and the Blush Rose on the darker area. Love, love, love all of them!


Although I'm not enamoured with the final piece, this was an excellent learning experience.
In The Pink - Front
In The Pink - Back
MC had a great collage of her blocks to date last month so I thought I'd do the same this month.


Now that we've had an easy month (he he), it's time for a tougher challenge, right? August is white. Yikes! More on white in the next week.

Happy Monday!

Wednesday 25 July 2012

Works in Progress Wednesday - July 25, 2012

It's been two weeks since I did a WIP report so it actually looks like I accomplished a lot. He he!

I've been getting my studio cleaned up and organized. It's slow going, but it's looking good so far, but there's still a lot more to go. I've also been getting at my scrap baskets and trimming scraps into strips or squares of various widths while watching TV in the evenings with the hubster. I want to use the scraps for a scrappy leader/ender project. I'm also intrigued with the idea that I saw on someone's site (sorry, I forget who!) Regina's Quilts about putting the unusable scraps into an old pillowcase. When it's filled up, I'll sew it closed and give it to an animal shelter. Love that idea! Thanks Regina!

New Projects: 
Colour My World Pink - July's colour is pink. I've picked out the fabrics that I'm going to use, but I'd better get a move on this because the end of the month is coming up fast!


Completed Projects:
Don't Worry {Bee} Happy - July's Block is for Marian of Lady Face. She picked the Sunshine block from the recent Fat Quarterly issue. If anyone else is doing that block, be aware that you actually need 20 of the little aqua dots (white in the pattern), not 16. At Marian's request, we are adding in a fabric of our choice. I hope she likes my choice!


Placemat: Another placemat for Daniel. I love those monkeys! Patrick has picked out his fabrics, but it's been too nice around here to stay in and sew. This is a sad little attempt at trying to get my kids sitting and eating properly at the table. So far, it's still a gong show.


Sophie's Growth Chart: Finished and blogged about! I'm still pulling together the tutorial for it for the Let's Get Acquainted Blog Hop, which was organized by Beth of Plum and June. Fun!

Current Projects: 
Hudson's Bay Point Blanket Quilt - Basted!


Seeing the Forest for the Trees Quilt: Blocks are complete! Playing with cornerstone and sashing arrangements. This?
Or this?

Can you even tell the difference? Me neither. And it doesn't really matter now because one of my kids turned on the fan and the sashing went everywhere. Oops. Now I remember why I didn't have a fan in that room. LOL.

On Hold/UFO Mash-up:
Modern Block Monday Sampler - No progress. On hold until the Fall.
Selvage pincushions - No progress.
Chop Suey
Wee Spy quilt
Spiral/Spring seta colour
Wedding quilt
Nine patch colourwash

WIP Wednesday Recap:
New projects: 1
Completed projects: 3
Current projects: 2
On Hold/UFO: 16


Related Posts Plugin for WordPress, Blogger...