Showing posts with label Sew Into Solids. Show all posts

Friday, 25 May 2012

TGIFF! - Homage to a Canadian/British Classic

Happy Friday, everyone! No idea where this week went, but here we are. I'm a little punchy this morning because I stayed up ridiculously late last night to finish this top. And son #3 is fighting a stomach bug this morning so we are cuddling on the couch watching his favourite show "Super Why" in between bouts of vomiting. Poor bug!

As riveting as Super Why is and as much as I enjoy the cuddling time, I know that if I don't do something right now, I'll fall asleep so here's my homage to the Hudson's Bay Company point blanket.

For those who've been following along for some time, I posted this EQ design a couple of months ago. I was pleasantly surprised at the response; clearly I'm not the only one with a love for those blankets!

Yesterday, the design went from this:
To this:
 To this:


As a number of you mentioned that you'd like to do one of these too sometime, I thought I'd share my measurements to save you some time. This quilt will be 90" square (I like my queen-sized bed quilts big).

Fabric for the top (NB: These are generous fabric requirements. I did not want a seam in the stripes and I knew I'd be using the colour stripes on the back too so I bought the stripe fabric for the width of the quilt):
  • 2 - 2.5 meters (3 yards) of off-white cotton making 5 meters (6 yards total)
  • 2.5 meters (3 yards) indigo cotton
  • 2.5 meters (3 yards) yellow cotton
  • 2.5 meters (3 yards) red cotton
  • 2.5 meters (3 yards) green cotton
Cutting Directions:
1. Fold all of your fabric so you will be cutting along the length of the fabric instead of the width.
2. From the off-white fabric, cut:
  • 22.5" wide by 92"
  • 2 - 6.5" wide by 92"
  • 6 - 4.5" wide by 92"
 3. From each of the indigo, yellow, green and red, cut:
  • 2 - 4.5" wide by 92"
Layout Directions:
1. Layout your stripes according to the design above, with your 6.5" off-white strips on the ends and the 22.5" piece as your centre, and sew them together.
2. You can square it up to 90" square now or wait until you've quilted it (I'd wait until you quilt it).

And voilà, you have your own HBC top. If you do make one, I'd love to see it and know if these directions are clear and easy to follow.

Being the rebel that I am, I'll be doing this "Party in the back" design for my backing. I'll share the measurements when I finish it. If you wanted to make this look like a true HBC blanket, you could make this top again for the back. 

I'm linking up with Allison and the other TGIFF! participants at Dreaming in Patchwork. She's got a fun Dorothy picnic quilt to share today. That's where I'm headed next!

Hope you have a great weekend!

Thursday, 12 April 2012

TGIFF! - Mod 1600

Welcome to TGIFF! Mod 1600 is done and I LOVES it! Yes, that grammar error was intentional.

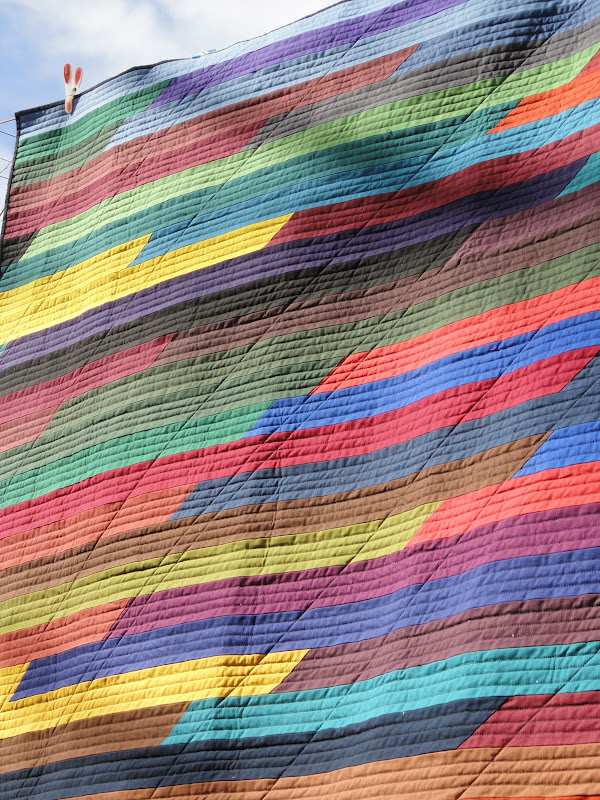
This quilt started with a Kona dark solid jelly roll. I did a jelly roll race with it for the top. That was quite the exercise is letting the colours fall where they may. In the end, I'm very glad I did because now I'm having fun looking at different sections of the quilt and discovering some great colour combinations.

Front of Mod 1600 -
Jelly roll race side


Back of Mod 1600 -
Fibonacci side
For the back, I used the Fibonacci ratio (1:2:3:5:8) for the colours. I'm really loving this analogous colour group lately, especially with black. 
Detail of quilting on the
jelly roll race side
Detail of quilting on
Fibonacci side
For the quilting, I did straight lines my walking foot width apart using the jelly roll race side as my guide. I thought about quilting in the ditch of the quilt seams but I thought that it would be too hard to keep it straight. In the end I'm so glad I didn't. For the Jelly roll race side, the seams continue the straight line look, but on the back the skipped lines give a different effect. I love the texture that the straight line quilting gives it!

Once I finished the straight line quilting, I added a few straight lines along a 45 degree angle, mimicking some of the seams between the strips.


For the binding, I used black with a little patch of red in the lower right hand corner. Just because.


Quiltography: "Mod 1600," by Michèle-Renée Charbonneau, Ottawa, 54" by 62.5", 2012.

This is also one of my projects for Sew Into Solids, a fun Flickr group I recently joined.

So happy with this one!

Happy Friday!

Friday, 6 April 2012

TGIFF! - Mod 1600 Back

Mod 1600 Top
How dare life interfere with quilting and blogging?! It's been a busy week, but I did get some quilting in. In fact, I finished the backing for my modern jelly roll race quilt, which I'm going to call Mod 1600.

The quilt is going to be reversible so I guess this is the other top. For fun, I thought I'd use the Fibonnaci ratio for the colours on the back: Yellow - 1 inch, Orange - 2 inches, Red - 3 inches, Violet - 5 inches, and Purple - 8 inches. It has a bit of a retro 70s look to it, I think. This is one of my projects for a Flickr group I joined called Sew Into Solids.

Mod 1600 Back
I've also sandwiched and quilted it with straight lines and the occasional diagonal. I'm working on the binding now and hope to finish it in time to share it next week, when I host TGIFF!

For today though, I'm linking up with Allison at Dreaming in Patchwork, who is this week's host for TGIFF! I'm heading over now to check out her beautiful new bag and the other fun finishes.

Happy Friday and Happy Easter all!

Monday, 2 April 2012

Modern Block Monday - Parisian Star


Happy Monday! This week's block is Parisian Star by Leanne Cohen. Leanne did her block with toile points on the stars and a fabulous subway map fabric in the centre of the star on a grey background. I did my black background and went with a scrappy palette for the star.


So this is a collage of the blocks to day. Fun, eh?


Completed Modern Blocks to date:
Next week, it's On The Fence by Weeks Ringle and Bill Kerr. Very simple and graphic!

Linking up to Sew Modern Monday -- if you get a chance, check out the modern goodness over there!

{Sew} Modern Monday at Canoe Ridge Creations

Thursday, 22 March 2012

Traditional...Yet Modern?

I've been sketching a bunch of possible future projects and of course, I want to get started on them all right away. I'm feeling some major quilting ADD right now. So many fun projects, but so little time. How do you decide what projects to start right away and what ones to hold off on?

One of the ones that I will get started on now actually fits with my goal of learning how to use Electric Quilt better. I keep trying to learn this program, but I don't find the program very intuitive or user friendly. I have EQ5 so I'm thinking that they've probably made some big improvements on the usability since then. Nevertheless I'm determined to learn it because I think quilting software is hugely beneficial for designing quilts. 

This week, I designed two very simple quilts on it. Here is one:

Doesn't this look better than my chicken scratch sketches? Yay!
For those of you who don't recognize this classic pattern, this is a Hudson's Bay Company point blanket. These wool blankets were used to trade with Native Americans for beaver pelts, etc. in the 1700 and 1800s. The blankets, with their signature four colour stripe, are a symbol of Canadian culture and history, both the good and the bad. I had one on my bed as a kid and just loved the simple pattern. I find it's actually quite modern, no? 

I'm not a fan of wool though, nor can I afford one of the real ones now so I thought it would be fun to make a quilt for our bed using this design. And the hubster agreed! Yay! Surely with this simple a design, I could design it in Electric Quilt to get a better idea of fabric requirements. And I did! Now to go get the fabric...

I'm going to try to scan in my fabrics for the other design that I did in EQ. When I figure that out, I'll share it.

I've been wanting to link up with Think Tank Thursday with making rebecca lynne for some time now and now have the chance! It will be up later today if you want to check out what other fun folks have been thinking up.


Thursday Think Tank


Hope you are having a great Thursday!

Friday, 16 March 2012

I'm Baaaack With a Finished Top and a Giveaway!

Okay, so I'm back a day early. For some reason, I thought the 16th was Saturday, but no, the blog hop starts today. I missed you guys!

March Break with the kiddos was fun, although we are still being dogged by illness. Oh well, it's been a pretty good winter so I can't really complain if we've got a few weeks of the blahs, right? Right! It turns out I did get some sewing time in this week. Woo hoo! Now, did I take advantage of that time to finish a few of my gazillion projects? Heck no! Why finish something when you can start something instead? Daniel was keen to make a placemat for him so we worked together on that and I'll share it next week when it's done.

The other project I worked on is this fun lap quilt. Ever since I saw Ginette's post about the Jelly Roll 1600, I've been itching to try it with solids. I was going to make my own jelly roll, but then I saw the Kona dark jelly roll at a guild meeting a few weeks ago and I couldn't resist.
Kona Solid Jelly Roll - Dark

I took my time (listening to the Steve Jobs biography -- fascinating!), but still had the top finished within three hours, which includes creating the initial 1600"-ish strip. Three hours for a quilt top that's approx. 56" by 64"! It didn't turn out as I had envisioned, but I still really like it. Very funky modern look, I find. It is bugging me that both yellows are on the same side, but wabi sabi, wabi sabi, wabi sabi! ;)

Here's a photo of the finished top being held up by my seven year old and his buddy. It's a little off, but there's hope yet for them to become my quilt models. Muuaahaaahaa! How do you like our Christmas lights?


I'm linking up to TGIFF!, which is being hosted by the fabulous Rhianon @ The Nifty Stitcher. She's got a gorgeous quilt she made for her sister. Her free motion quilting is seriously awesome! Check it out and you're welcome to link up one of your own recent finishes!

Okay, it's time for the giveaway! Today's giveaway is two batik fat quarters and one long quarter of this fabulous graduated batik that goes from yellow to green to blue-grey. I picked these fabrics up in Digby, Nova Scotia last summer because it reminded me of the ocean there and I thought I'd share some of it with you!

This giveaway is open to everyone until March 23, 2012 at 6 p.m. EST. Ms. Random Number Generator will pick the winner and I'll post it sometime on the 24th. So what to do to win?
Blog Hop Party with Give-Aways

1. Leave a comment about something fun you did this week.

Bonus entry for followers:
2. If you are a follower or become a follower, leave a comment letting me know.

If you are a no-reply blogger, make sure your email address is in your comment. If this Blog Hop Party is anything like the last, I might not be able to keep up with replying to the comments, but I do read every one and I thank you in advance for entering!

There are a ton of other great giveaways linked in at the Quilting Gallery's Blog Hop Party so go check it out.

Oh, and I heard that The Quilt Show with Alex Anderson and Ricky Tims is going to have all of their past episodes available for free this weekend, March 16-18. Happy St. Patrick's Day to us...or Happy International Quilting Weekend!

Now, I'm off to play ringette in a tournament this weekend. Woo hoo! Fingers crossed that the back holds up!

Good luck and have a great weekend!
Related Posts Plugin for WordPress, Blogger...